| Home | Newsletter | Locations | Diary |
|
Indexes |
|
|
|
Article Creating Vintage Images - Old Look PhotosHave you thought about creating vintage images, old look photos, perhaps trying to mimic photos taken in the past or mixing up your relations alive today with ancestors no longer around.
There is not a single look, for older photos, but a whole series of looks that
came about with each stage of the development of photography, with new
materials and equipment, and its still progressing today with several new
picture types coming out in the last year or so, like the Nikon
format that captures an image but also some movements, or the the images
from a
Lightfield camera or Plenoptic camera
Over time much has and still is changing, many of us started with dark rooms using chemical baths, dodging and burning images to adjust the light in sections of the image as we exposed the photographic paper with the enlarger, shining a light through a negative. Today its done in digital editing. We now have far more capability, and photography is now open to a wider range of people, but we have lost the magic of watching an image slowly appear on photographic paper in the developing bath. Old skills are no longer required but new ones have to be learnt.
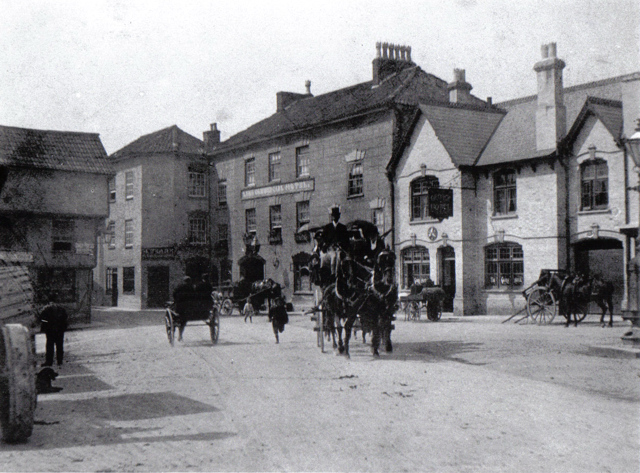
Axbridge, Somerset March 1905
(Then
and Now
Many of these technological changes affect the look of the image.
Go back a few more generations and images were created in contact
frames rather then enlargers, and the image then is the same size as the
negative, so if you wanted a large print you needed a large camera able to
hold a large negative, while smaller images could be obtained by putting in
a different carrier to hold film or before that a glass slide of a smaller
size, or you could use a smaller camera. So folding cameras, box cameras and
the land cameras come in a variety of sizes. We have a
list of
film sizes
Pre digital images have grain, not pixels, and this grain coming from the negative was coarser with faster films than slow ones. Different film makes and types within a make had deferent grains. Over time generally grain became smaller and faster films had less grain. Many digital editing packages have an inbuilt filter to simulate grain in an image, some have several or allow adjustment of the effect.
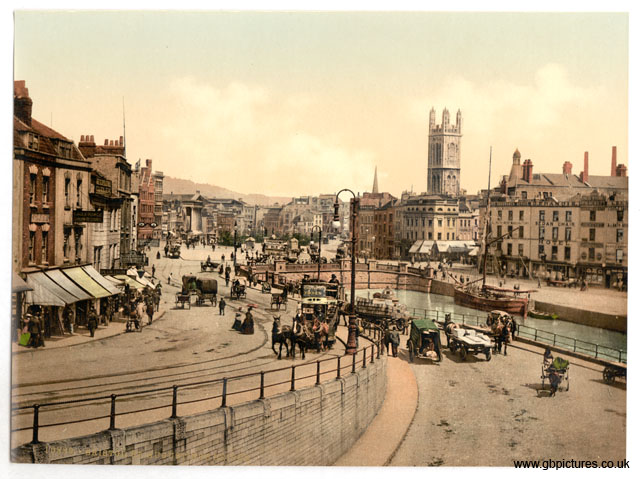
Photochrome print of Bristol around 1900, notice the horse drawn tram Most images were
monochrome
Although we look
back at this time and before and talk of black and white photography, in
fact many of the images were not black and white, they varied depending on
the paper used, bromide and bromesko being the most common one, producing
black and while and the other a dark brown and white, some might call it
Sepia,
Most prints were produced with a matt surface, to produce a gloss you had to have gloss paper but also use a glazing drum or plates. For production runs the glazing drum was a heated very shinny polished drum with a material blanket that worked like a conveyor belt, holding the print tight against the drum while it dried, having been put in wet, and rotating the drum, so you had it rotating around which prints travelled starting wet and coming off dry but with a gloss finish. Any marks on the drum would show in the gloss of the print so everything had to be spotlessly clean and the drum kept highly polished. There were a variety of matt and lustre finishes. Photo print paper today is available in a number of finishes, so its worth looking at these when looking to choose paper to print on if you are trying to simulate prints from an earlier time. When prints were produced, either with an enlarger or in a contact frame, the paper had to be able to be held, so there was nearly always a white border around the edge. From the mid 1970s, a few of us had magnetic corners we could hold paper down with that worked with friction so allowed the production or borderless images. Normally if you find pre digital images without a border that have not come from a processing lab, then they normally have borders or the images have been trimmed and is smaller than the standard sizes. Images that were processed in developing and printing labs were often printed on roll paper and then chopped up. Professional photographers at the time would not use roll paper as you could adjust the contrast in the images by using different grades of photographic paper, and a roll fed system had just one grade, so often resulted in lost highlights or detail.
While there were a
number of earlier colour print processes, if you come across colour images
of individuals rather than published prints, for example wedding photos from
just after the second world war or before, then these you will find, if you
inspect them carefully, were produced in black and white and hand coloured.
Most professional photographers pre digital would do some spotting,
touching up prints to cover dust or drying marks on the negatives, but the
art of hand colouring was largely lost and two expensive in manpower before
colour became widely available but it was still practiced into at least the
mid 1950's. The National Trust has a house in Liverpool that was the home of Mr Hardman, a professional
photographer, for more details see
The Hardman
House, Photographers
Studio.
Toning is a technique that was used to produce
images of different colours and in some cases two or more colours.
Sepia
With early
photographs and lenses, the fall off in brightness from the centre of
the image to the outside is very noticeable, and a similar effect was a
problem with digital photography to start and the reason why smaller than
full frame sensors were used by most camera manufacturers. Later this effect was created by design and still
is today to highlight the
central part of the image. It can be done with landscapes to pick out the
main part of the scenes, while also including the surrounding area, or for
artistic effect in portraiture or wedding photography where the edges are
made to go far darker and sometimes completely black. We now call it
Vignetting.
Early lenses ware also far simpler and softer than the ultra sharp lenses we
usually use and have become accustomed to today. However by choice we can use a variety of techniques or
equipment to produce
soft
images.
An amazing number of images survive
from all points, and by a very wide range of processes. Camera collectors
and people interested in historic prints and the collecting of them have
listed print sizes by camera, and there are many sizes, as well as much more.
My own collection of old photographs have examples from many forms, and
times, but my favourite are the
photochromes,
Given the print size, colour, texture, grain, surface, amount of vignetting, sharpness, and general look, we can learn a lot from an old print before we even look at the image it contains. Often information contained like clothing, state of building or roads, and identifiable places allow us to create, for the image, a far wider story than just what is in the image, often we can tell the camera it was taken on and the paper used, and also have a very good idea of the date it was taken. To recreate the look of these earlier photographs, we don't need a time machine, or to go back to using plates or cut film and wet techniques in the darkroom. We can produce similar effects with our digital equipment, accessories and in editing. The first stage is to determine the factors we have mentioned above or those we feel matter. I would suggest producing a list of features we are looking to include and then to look at how we can mimic each of these. Here are a few suggestions to get you started Print size and shape. Older formats are generally less letterbox shape than current ones. Sheet film came in many sizes as did plates. Film sizes also varied considerably with common sizes being, plate 8.5x6.5 inches, half plate and quarter plate varying in size slightly. 10 by 8 inches being an early plate size along with 5x4 and 2 1/2 by 3 1/2 inches. The following three tables will help you to identify the size and shape. Another alternative is to look up individual historic cameras and see the format and shape, remember there were many. What colour do you want your image to be. In many better cameras you can take images in black and white, sepia etc, from in camera settings. Nikon for example, in many of their cameras, have a range of shades in a range of colours, and if use RAW images you can switch back after to colour or to any of the other tones, likewise any RAW colour photo can after be switched to any of the tonal images. Relative tone shades for different colours, can be adjusted with filters, on the lens, in the camera settings or in editing afterwards. This is particularly relevant when you have two colours that produce the same shade of grey, for example red roses with green leaves, both are about the same grey, but if we use a red filter the red rose becomes lighter and the green leaf areas darker, while if we use a green filter the red rose becomes darker while the green leaf areas are lightened. The strength of the filter determining how great an effect it has. You can greatly improve skies and more using these techniques. For more information see:-
While you can do this all at the point when you are taking the photos, many editing packages have a range of filer effects mimicking these Contrast. With chemical photography different paper grades were used to adjust the image contrast, today you can do this in the camera settings, but in practice its far easier to take a RAW image and adjust this back in editing. Image sharpness, perhaps you want an image not as sharp as we are used to today, this can be done by using a poor lens, a soft effect lens or shooting through fine netting or the like. You can also simulate it in editing by a number of methods. Focal length of lens and perspective. Zoom lenses did not exist and many cameras had just one lens. For most photographers the only option to get the photo was to get to the right spot to get the image as they wanted. Remember no sectioning or enlarging, the image had to be taken as it was to be printed, and if it was going to be a large print then a large camera had to be used and transported. They had the advantage that they could put their tripod in the middle of a road and spend time under a cloth, without being run over. Photographic
skill.
Like today some photographers were far more skilful than others,
images were taken without the use of an exposure meter, and as materials
were expensive, every shot had to count, so more preparation and
thought went into each photo than today. For example when I was young, 14
I think, I rented a plate camera with sheet film holders to take
colour postcard images, having found a prospective client, there was no
guarantee so this was at my own cost. I obtained a box of 10 sheets
of colour transparency film, out of this I had defined shots to take with
8 of them, so with no exposure meter and a large tripod based plate camera
I had never used before, I had to make every shot count. Images were
focused upside down and back to front on a ground glass screen under a
dark cloth, and the
exposure
Many of these older cameras, including many
folding cameras had lifting fronts, giving the same effects as a
perspective control (PC) lens today. With some you could change the angle of
the image plane to the lens in several directions, allowing different
focusing arrangements, in affect graduated focusing, useful for images
down a street. So while we can do a lot there are a few techniques that
earlier photographers would have taken for granted that very few today can
handle. To see what you can do take a look at
Making Buildings Stand Up
Straight.
Things are so much simpler now and the luxury of taking many images, allowing more opportunities to get it right. BUT there is less thought and concentration today on each image, so perhaps some photographers from older times will still have better images than people snap today. As today, some had more skills, some better equipment, and some could not carry their kit to their ideal spot. Most image defects we see today and some others were evident, so as the architect of your image you will need to decide the skill, available equipment and effects you want to produce. Stains on paper and crinkles. If the photographer did not wash the print for long enough then over time, and some times very soon after being made, the print will have shown orange/yellow staining, and often the back of the print will be discoloured. Often when prints were dried, if not handled correctly, curls, crinkles and other effects would be shown. The decolouration can be mimicked with many papers by putting in or artistically spilling tea on them, while crinkling can often be created by getting the paper wet, and then stretching some parts slightly, but carefully. You will need to experiment with different papers, many plastic papers are less effective for this than others. Try not to overdo this, it is often most effective when just visible, giving an ageing effect without distracting from the image. Paper surface. Different printing papers you can get today have different surfaces, and this is the easiest way to get this. Alternatively you can get paper wet and dry it pressed against a surface that produces a marking, but if you do ,make sure you keep it flat and make sure its completely dry before printing on it. Incidentally if you have a raised pattern and put some weight on the paper you will get watermarked paper, with the pattern visible when you hold it up to the light, but no printing money now! Content. To look like an old photo, the content needs to match the rest, period properties, no TV aerials, old style roads with no markings, the right crops and animals, vehicles, clothing etc......
Some historic photos cannot be recreated
today, particularly places that have greatly changed or others that have lost
features. It would be fairly easy to get hold of an old car and put it
near a steam railway line, and have people in costume, but the centre of a
city with steam driven vehicles or horse drawn trams would present a far
greater challenge. Some of the
UK Living History Museums
Another place or route to start would be the 'Then and Now' style of photography, discovering the difference that time has brought to a place. For more information on this see:-
Derbyshire Then and Now Locations
Somerset Then and Now Locations
John
Constables Painting Locations Then and Now
Living History
section
And Finally From this you can see this can become a complete science and art form in its own right. Perhaps it's worth trying just for a challenge, perhaps to produce props for a movie or theatre production, or perhaps Then and Now or family tree developments.
See Also:
|
||||||
|
||||||
| . | ||||||
|
||||||
|
|